Open a Headlight Of a Car- To avoid scratching the lens, place your headlight upside down on a towel or other soft surface. Find all of the screws that hold the lens to the backing by looking around the headlight’s edges. Using a screwdriver, remove the screws by turning them counterclockwise. To gain access to the interior, you will need to disassemble your headlights in order to customize or black out them. The glue-like sealant that covers headlights can make opening them more challenging. To break the seal around the housing, you only need a few tools and an oven, which is good news. You won’t have to worry about breaking the headlight if you use low heat and handle it carefully.
Open a headlight of a car to check the condition of its light bulbs. A headlight is a component of a car that produces light to illuminate the road and make it more visible at night or in low-light conditions. It is typically located on the front of the vehicle, near the windshield. A headlight may have several different types of light bulbs, each with their own purpose and function. Some types of bulbs produce more visible light (such as high-intensity discharge or halogen) while others may produce less visible light (such as low-voltage). It is important to open a headlight to check the condition of its light bulbs as they can become damaged or broken due to impact, weather, or aging. By opening a headlight, you can ensure that your vehicle has good visibility and safety at all times.
How to Open a Headlight Of a Car
It is common practice to simply heat a sealed headlight in an oven at varying temperatures until the glue that holds it together becomes weak enough to be pried apart. Heat the entire edge of the headlight with a heat gun until you have worked your way around multiple times. The headlight’s exterior seal ought to be nice and hot. Keep the heat moving and don’t hold the heat gun still for too long to avoid melting. You will most likely be stopped if your headlight is broken or burn out. The officer may let you off with a simple notice to fix the violation and pay a small fine if it’s been out recently or you didn’t know it was there.
Open a headlight of a car is one of the easiest and most efficient ways to get rid of excess heat. All you need to do is open the hood of your vehicle, find the light, and turn it on! The light bulb in your headlights can act like a miniature radiator, releasing heat as it glistens. And since cars are designed to provide maximum visibility at all times, they tend to generate more heat than other vehicles. So opening a headlight can help keep your vehicle operating at peak performance.
How to Open a Headlight Of a Car Details


| Article for | How to Open a Headlight Of a Car Step by Step Full Guide 2024 |
| How to Open a Headlight Of a Car | Click Here |
| Category | How to guide |
| Official website | Click Here |
click here:-How to Build a LEGO Car 2024?
How to Open a Headlight Of a Car Step by Step Full Guide
In this article, we will be discussing how to open a headlight of a car. This is an important step because it will allow you to inspect the condition of the light and change the bulb if necessary. First, you should turn off the vehicle and remove any keys or other objects that could cause the ignition to turn on. Next, you will need to unlock the car’s door using the keyless entry system. Some cars have a button on the fob that can be pressed while others may have a button on the door panel. If you don’t have access to a keyless entry system, you can use a screwdriver or other small tool to unlock the door manually.
After unlocking the door, you can open it fully and safely by pulling it toward you or away from you depending on your car model. Once inside, you can approach the headlight and gently pull it out of its socket until it comes free. You may need to use a small flat-head screwdriver or similar tool to loosen and remove any retaining nuts holding on the lens assembly. Once removed, you can inspect and clean any debris from inside the lens and replace any parts that are damaged or need replacing. Finally, make sure all of your work is done correctly so as not to damage your car’s headlight in case of an accident.
Also Check- How to Remove Vomit Smell from Your Car
Removing the Headlight
1. Lift the hood of your vehicle. On the driver’s side of your vehicle, locate the lever or button that opens the hood. To hear the hood latch open, either pull the lever or press the button down. Completely raise the hood to prevent it from falling while you are working.
- If you can’t figure out how to open the hood, check the owner’s manual for your vehicle.
2. If the bumper cover is in the way of the headlight, take it off. The long body panel on the front of your vehicle that covers the metal bumper is call the bumper cover. Find the bolts that hold the bumper cover to the body along the top edge if it covers your headlights. The bolts should be turn counterclockwise with a socket wrench until you are able to pull them out. The next step is to look underneath the bumper cover and loosen any bolts that are there. You can loosen the bolts by inserting a flathead screwdriver into the seams that separate the cover from the wheel wells. To remove the bumper cover, raise it up and pull it away from your vehicle.
- If you have trouble finding the bolts on your bumper cover, consult the manual for your vehicle.
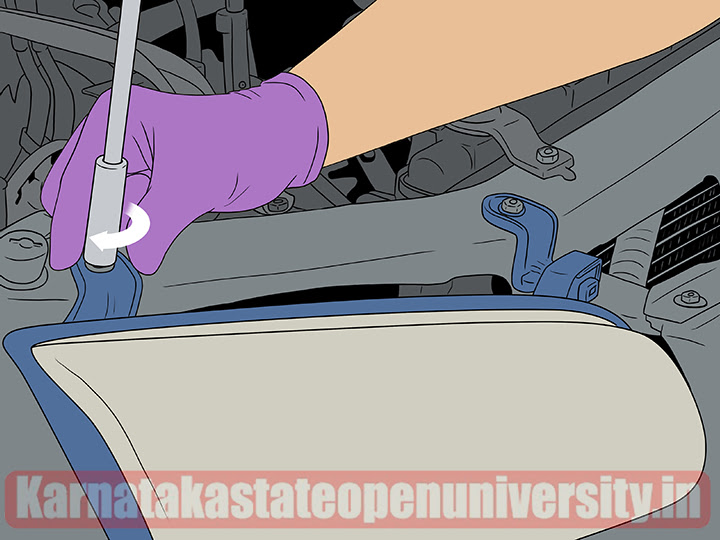
3. The bolts that hold the headlight assembly in place should be unscrew. Two or three bolts hold the headlight assembly to your vehicle if you look along its upper edge. To loosen the bolt, place a socket wrench over its head and turn it counterclockwise. To allow the headlight to move freely, keep unscrewing the remaining bolts.
- Additionally, there may be one or two bolts running along the side or bottom of the headlight.
Check Also- How to Clean Car Carpet Stains
4. To remove the headlight, disconnect the connectors that are attach to its back. Pull the headlight straight out of your vehicle by wriggling it loose so you can reach your hand behind it. Follow the wires that connect the back of the headlight to your vehicle. Pull the square block connectors that are holding the wires apart with care. The headlight can be easily remove completely from your vehicle once the one or two connectors have been remove.
- When the headlight is taken off, some of the wires will still be sticking out of the back.
- If you try to remove the headlight from your vehicle by force, you run the risk of damaging the connectors.
5. The headlight’s screws should be removed. To avoid scratching the lens, place your headlight upside down on a towel or other soft surface. Find all of the screws that hold the lens to the backing by looking around the headlight’s edges. Using a screwdriver, remove the screws by turning them counterclockwise. Put the screws in a small cup to keep them from getting lost.
- After you think you’ve removed every screw, check again. You run the risk of cracking or breaking the lens if you attempt to open the headlight while there are still screws in it.
- The lens and backing may only be held together by adhesive sealant on some headlights, which may not have screws.
6. Remove the bulbs from the backing of the headlights. Find the circular ports in the backing where the backs of the bulbs are screwed in. To release the bulb’s base, pinch it and rotate it counterclockwise. Remove the bulb completely from the backing and place it aside where it won’t be damaged. Using the same method, remove any other headlight bulbs.
- If you are unable to do so, you are not required to do so.
- The rubber housing caps need not be removed. The caps won’t melt because the temperature of the headlight is the same when it is turned on.
Check Here- How To Redeem YouTube Premium Code
Baking the Headlight Open in the Oven
1. Wear old clothes and gloves that are disposable. The sealant will be extremely sticky and adhere to anything it touches once the headlight has been heated. To avoid getting any sealant on your skin, wear a pair of washable work gloves. In the event that sealant gets on it, put on an old shirt that you don’t mind getting dirty.
- In order to make it simpler for you to operate the headlight, you might want to cover your disposable gloves with a pair of heat-resistant gloves.
2. Preheat the oven to 104–121 °C or 220–250 °F. Check to see that the oven is big enough to hold the headlight without it touching the sides. Before turning on your oven, lower the oven rack to its lowest position. Before inserting your headlight, allow it to fully preheat.
- You can also use a heat gun and a cardboard box if you don’t have an oven. Choose a box large enough to accommodate your headlight. Make a hole in the bottom corner that is the same diameter as the nozzle on the heat gun. To heat the box’s interior, insert the heat gun through the hole and turn it on to 250 °F (121 °C). You run the risk of breaking the headlight assembly if you use the heat gun by hand because you won’t heat the sealant evenly.
3. Place the headlight on the oven’s wood planks. Wood is ideal for baking your headlight because it does not retain heat as well as metal does. Boards that are short enough to fit inside your oven should be 2 in x 4 in (5.1 cm x 10.2 cm). Set your headlight inside the oven after placing the planks on the rack. To avoid melting, make sure the headlight does not directly touch the oven’s rack or sides.
- You can also use a cookie sheet lined with one to two layers of baking paper if you don’t have any pieces of wood.
- As long as your headlight does not come into contact with any metal, the heat will not harm it.
4. For fifteen minutes, place the headlight in your oven. While baking the headlight, keep the door closed so that the heat can circulate around it. Make sure your headlight hasn’t shifted or fallen off the planks after 5 to 10 minutes. Use oven mitts to remove the headlight from the oven after 15 minutes to begin working on it.
5. Remove the tabs that hold the lens to the backing of the headlight. Find the plastic tabs that secure the lens to the backing around your headlight’s edges. With your fingers, lift each tab up to separate the two parts of your headlight. Put a pry bar or flathead screwdriver under the tab and pry it up if you have trouble peeling them apart by hand. Until you have removed all of the tabs, work your way around the entire perimeter.
- Be gentle with the tabs or they will break and your headlight won’t stay in place as well.
6. Using a flathead screwdriver, pry the lens from the backing. Make sure the tip of your screwdriver is insert into the seam that runs between the clear lens and the backing of your headlight in the bottom corner of your vehicle. To remove the lens from the adhesive, carefully push the screwdriver into the seam and tilt the handle toward the backing. Try manually gently separating the pieces after making a small gap. Work the screwdriver around the seam if necessary to separate the pieces.
- As it cools, the sealant will harden, making it harder to remove the headlight. If necessary, return the headlight to your oven for a few more minutes to soften it once more.
- With the tip of your screwdriver, be careful not to scratch the lens of the headlight.
Click Here- How to Co-Own a Car 2024
Resealing and Reinstalling Your Headlight
1. Using a screwdriver, scrape the old sealant off the backing. Place the screwdriver’s tip in the channel around the headlight backing’s edge. To remove as much sealant as possible, use the screwdriver to go all the way around the backing. To prevent the screwdriver from becoming stuck, clean it as it gets dirty.
- Sealant is most effective when removed when it is still warm and malleable. If the sealant became solid, you can soften the backing by placing it in the oven for an additional five minutes.
- The old sealant should not be left in the headlight because it might make air bubbles and not seal properly.
2. Make any necessary adjustments to your headlight. The interior components of your headlight assembly can be easily modified when the assembly is open. Tape off the reflectors and other areas where you don’t want paint to get on your headlights if you want to darken them. The backing should then be coated with black spray paint. If you want to install halo lights, run the wires through one of the backing’s holes or seams to attach them to your vehicle. The light kit should be attach around the edges of the backing.
- Make sure to disconnect the battery before wiring new lights to your vehicle’s electrical system to avoid shock.
3. Apply new butyl sealant to the headlight backing’s channel. The flexible rubber material known as butyl sealant is use to create an airtight seal around the lights to prevent moisture from entering. Remove a small amount of the sealant and use your fingers to press it into the channel. Keep wrapping the strip of sealant around the backing’s outer edge until it is flush with the surface. Cut the piece of sealant after you have completed the entire circumference of the channel and press the edges down.
- Butyl sealant can be purchase online or at a car parts store.
- Because it is flexible and stretchy, butyl sealant can be molded into the channel until it fits perfectly.
Check Here- How to Close HDFC Credit Card
4. Your oven should be preheated to 135 °C (275 °F). Put the broiler rack on the base position so there’s sufficient space for air to circle around your front lamp. Before putting your headlight inside, turn the oven on to 275 °F (135 °C) and let it heat up completely.
5. To soften the sealant, place the backing in the oven for 10 to 15 minutes. Your oven’s headlight should be position so that the sealant-filled channel faces upward. Leave the backing inside the oven for at least ten minutes after closing the door. To eliminate any air bubbles, the sealant will soften and melt slightly. Remove the oven’s headlight after 10 to 15 minutes.
- The plastic may melt if the headlight is place directly on the oven rack or against the sides.
6. Attach the lens to the backing with screws. To reseal the light, align the lens with the backing’s channel and press it down hard. Feed the screws that you removed earlier from the backing through the holes in the backing. Using a screwdriver, tighten the headlight assembly by turning the screws clockwise.
- When you reinstall the lens, it is acceptable if some of the sealant leaks out of the channel. Using a paper towel or a screwdriver, simply scrape the excess off.
Click Here- How to Replace Your Car Door Key
7. Make sure the backing and lens don’t move by clamping them together. To secure the lens in place, place the first clamps in the corners of the headlight. After that, evenly space one or two more clamps on each side of the headlight. This helps to ensure that the lens does not sag when it sets.
- To ensure that the clamps are safe to use in your oven, check to see if they are made of metal or resistant to heat.
8. To seal the headlight, put it back in the oven for five minutes. Keep the headlight in the oven while the sealant hardens around the lens by placing it back on the wood planks. After five minutes, remove the headlight from the oven once more and allow it to cool.
9. The bulbs should be return to the backing. Feed the bulbs back through the backing’s ports when the headlight feels cool to the touch. Before turning the bulb counterclockwise to hold it in place, push it in as far as it will go. Before you reassemble the headlight completely, screw in any remaining bulbs.
- If you don’t want to worry about the old bulbs burning out, use new ones.
10. Return the headlight to your automobile. Hold your headlight assembly near the port of your vehicle by opening the hood. To reconnect the headlight to power, plug the connectors back into its backing. Install the headlight by pushing it into place and bolting it to your vehicle. Finish your repair by reattaching any other parts you had to take out of your vehicle!
- Try starting your vehicle’s battery and turning on your headlights after plugging in the connectors to make sure they work. There may be a problem with the connection or the bulb if they do not.
Related Post:-