How to Tint Car Windows- Tinted car windows typically shield the skin from harmful ultraviolet light. Additionally, they provide privacy from prying eyes in your vehicle. The majority of people are able to tint their own windows with just a few basic tools, despite the lengthy and time-consuming process. Tinting the windows of your car or truck adds style, reduces sun glare, and keeps the interior cooler. It filters 90% of the sun’s infrared radiation (IR) and blocks up to 99% of ultraviolet radiation (UV). Your air conditioner will run more effectively and interior surfaces will be shield from sun damage as a result. As a good way to protect yourself from UV radiation, which is a major cause of skin cancer, the Skin Cancer Foundation advises limiting your exposure to them.
Tinting your car windows is an easy way to protect your vehicle from the sun and other harmful rays. There are different types of tinting materials available, from clear films that let in light but filter out harmful UV rays to darker varieties that absorb more of the sun’s energy. You can also choose between single- and dual-tinted windows, which offer different levels of protection for each side of the vehicle. Many car dealerships will tint your windows for you, but if you want to do it yourself, there are a few steps you can take to get the best results.
How to Tint Car Windows
The windows in your car let you see what’s going on outside, but there’s a downside to this obvious advantage. Rather than calling it a light side, it probably should be called a heat side because heat causes damage to the vehicle’s interior, melts that big Slurpee you just bought, and generally makes the vehicle uncomfortable until the air conditioner can do its job. First, you need to decide on the type of tinting material you want. Clear films are great for protecting your eyes while allowing a small amount of light through. They’re often used on windshields, headlights, and sideview mirrors.
Darker films are great for blocking more UV rays and protecting your car’s interior from fading or breaking down quickly. They’re often used on the windshield and rear windows. You can also choose between single- and dual-tinted windows, which offer different amounts of protection for each side of the vehicle. Single-tinted windows let in some light but block most of the UV rays, while dual-tinted windows allow more light in but block some of the UV rays as well. It all depends on what level of protection you want for your car’s interior. Continue reading to learn how to save hundreds of dollars by installing window tint film yourself.
How to Tint Car Windows Details


| Article for | How to Tint Car Windows Step by Step Full Guide 2024 |
| How to Tint Car Windows | Click Here |
| Category | How to guide |
| Official website | Click Here |
click here:- How to Build a LEGO Car 2024?
How to Tint Car Windows Step by Step Full Guides
The majority of tinted glass used in automobiles prevents sunlight from entering the interior. Even when a car’s air conditioning provides some ventilation, the summer heat still irritates many passengers on hot summer days. Some people choose tinted glass for their car windows to avoid the direct sunlight. However, tinted windows are not standard equipment on the majority of automobile models sold in India. Sunscreens, on the other hand, are typically purchased as additional accessories for automobile owners to block sunlight. The tinted glass prevents the interior from being worn out by sunlight and serves the primary purpose of lowering the temperature inside. Additionally, one advantage of tinted glass is that it provides the occupants of the vehicle with privacy.
There are several types, each with specific features, characteristics and properties in this Tint.
- Dyed: Mostly used for appearance and privacy.
- Metalized: Embedded with metallic particles that reflect heat and UV radiation.
- Hybrid: Combines the best characteristics of dyed and metalized tints.
- Carbon: Micro layers of polymer and carbon reduce UV and IR.
- Ceramic: Highest quality and most technologically advanced tint available.
You can purchase window tint pre-cut for your vehicle, or on a roll that you cut to fit.
Also Check- How to Make a Simple One‐Direction
Things To Consider When Choosing Window Tint
Think about your car tint, safety and above all your state’s tint laws before choosing the type and VLT percentage.
- If the windows are too dark, it can make it harder to see when you are driving, especially at night.
- Seats, carpets, the dash pad, and trim last longer when they are protected from UV and IR light.
- Interiors that are cooler use less air conditioning, which improves fuel economy.
- Your vehicle’s appearance can be improved and appealed to by tinting the windows.
- Tinted windows make it more private.
How To Tint Car Windows?
When installing window tint, work in a garage or other clean, dry, shaded, and free of dust location. Do not rush and be patient. To complete the task correctly, carefully follow each step. The proper installation of window film on each side window may take up to 30 minutes.
Keep your fingers moist by using soapy water. When installing the film, do not crease it. It helps to have extra hands on deck car.
Check Here- How to download Facebook videos
Tools/Materials
Before beginning the installation, check to see that you have everything you require. Consider purchasing a low-cost installation kit that includes the following items:
- Window film;
- Large spray bottle full of soapy water — you’ll need at least a gallon, so premix two tablespoons of dish detergent with a it gallon of warm water;
- Razor blade scraper and blades;
- Microfiber towels;
- Tint squeegee or applicator;
- Silicone squeegee;
- Precision knife with replacement blades;
- Vacuum cleaner;
- Heat gun.
Prepare the Windows
Never use an ammonia-based commercial glass cleaner. The tint’s color can be changed by them.
Clean the interior with a vacuum to remove dirt and dust. Use soapy water to thoroughly clean both the inside and outside of the windows. After cleaning the top of the glass by lowering the window, raise it to the closed position. Once more, wet the window. Clean any remaining dirt, grime, or sticker residue with the razor scraper.
Completely clean the area around the window trim, including seals, gaskets, and any nooks and crannies where dirt or grime might be hiding. Utilizing the squeegee and dry microfiber cloths, completely dry the glass. To allow the squeegee to dry beneath the window seals and trim, wrap a cloth around it.
Check Also- How to Push Start a Car 2024
Size the Tint Film
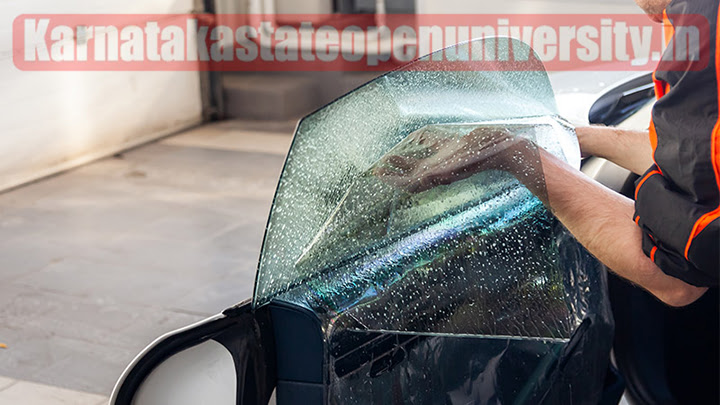
It is essential to identify the adhesive-covered side of the film. Keep the adhesive liner in place. You are not installing the tint in this step; rather, you are using the outside of the glass as a template. Beginning at the passenger side front window:
- Use soapy water to cover the outside of the glass.
- Discard the tint.
- Cover the entire window’s exterior with adhesive, facing you and leaving plenty of overhang.
- Remove this section from the roll.
- To temporarily hold the tint in place, lightly press it onto the glass.
- Reduce the film to a size that is manageable—close to a square—and leave an overlap of two to three inches over the glass.
- Smooth the film with the tint squeegee after it has been wet.
- Using either your hand or the squeegee, hold the film in place.
- Cut along the bottom (from front to back) and then along the back of the glass with the precision knife, following the window seals as a guide.
- Pro tip: Use just enough pressure on the blade to cut the film at a low angle.
- Pull the film straight back until it covers the back of the window by 1/2 inch, the edge you just cut.
- The section of the film closest to the sideview mirror needs to be cut off.
- The center of the film should be 1/4 in. of additional film at the glass’s front and back.
- Pull down on the film until it is one inch below the glass’s bottom.
- The film’s bottom should be wet, and the film should be gently lifted away from the glass or body’s bottom.
- One inch lower the window.
- With the tint squeegee, wet the glass and smooth out the film.
- Using the glass as a guide, cut the film’s top edge.
- Cut away any excess film from the front or back of the glass with care, leaving a 1-inch overhang at the bottom.
- Smooth out any creases or corners.
Also Check- How to Remove a Dent in Car
Apply the Tint Film
- Wash and dry thoroughly the inside of the window as well as all of the window trim and seals once more. The film will bubble if dirt or dust is left behind.
- Apply a lot of soapy water to the inside of the glass.
- Before removing the film from the outside window, remove the adhesive backing.
- Pro tip: The film slides into place more easily when soapy water is sprayed on the adhesive.
- Peel the film from the outside glass with care while the window is one inch lower.
- Place the wet side of the adhesive on top of the glass inside.
- Pro tip: Roll the bottom edge up before applying the film to keep the adhesive from picking up any dirt.
- Spray the film before sliding into place.
- Place the film in the middle and leave about 1/16 in. of space below the window’s top.
- Using the tint squeegee, work toward the sides and top to remove air and water bubbles.
- Lift the window up.
- Spray the film and glass’s bottom.
- Once more, remove all of the air and water bubbles from beneath the film with the tint squeegee.
- Tuck the film’s exposed edges carefully under the window seals with the squeegee or applicator.
- Continue spraying the film as you remove air bubbles to keep it from tearing.
- Pro tip: The film can be stretch with a heat gun to fit curve windows correctly and remove air bubbles and excess water. Avoid getting too
- close or using the heat gun for too long on a single area. The film may be damage by excessive heat.
- Dry the film with a lint-free microfiber cloth after it is finish. Repeat these steps for each window. To allow the adhesive to fully cure, do not cut the windows down until seven to ten days after you are finishe.
Related Post:-
How to Make a Balloon Car 2024
How to Make Out 15 Simple Steps 2024?