Make a Simple One‐Direction Electric Toy Car- One of the childhood toys that adults can still enjoy is remote control cars. When you can make your own, why buy a brand-new RC vehicle? You will learn how to construct a basic one-direction toy car, which can only move forward and backward. Also, keep in mind that unlike actual RC cars, this one is not wireless, so it will have a long wire attached to the car. One of the simplest ways to make an electric toy car is to use an old, broken toy. You can find them at garage sales and goodwill, or even in your kids’ rooms.
Simply take apart the toy and remove all the parts. Then, you can put together the individual components into a working car. Another simple way to make an electric toy car is by using a battery and some wire. You can purchase these items at a local hardware store or online. Simply connect the battery to the wire, and you’ll have your own little motor/ If you want to make a more complex one-directional electric car, you can purchase a ready-made remote control car from an online store or a toy store. Then, use your imagination and creativity to design a race track for it!
How to Make a Simple One‐Direction Electric Toy Car
Place a magnet on the tabletop’s bottom so that the car’s pole and the tabletop’s magnet’s pole are opposite one another. The car will move in any direction away from the magnet if the magnetic poles are not positioned opposite one another. Attaching a string to the “snap” lever on a basic mousetrap car, looping the other end around a small hook on the axle, winding the string around the car’s axle, pulling back on the lever, and arming it powers the car. This is what happens to the car.
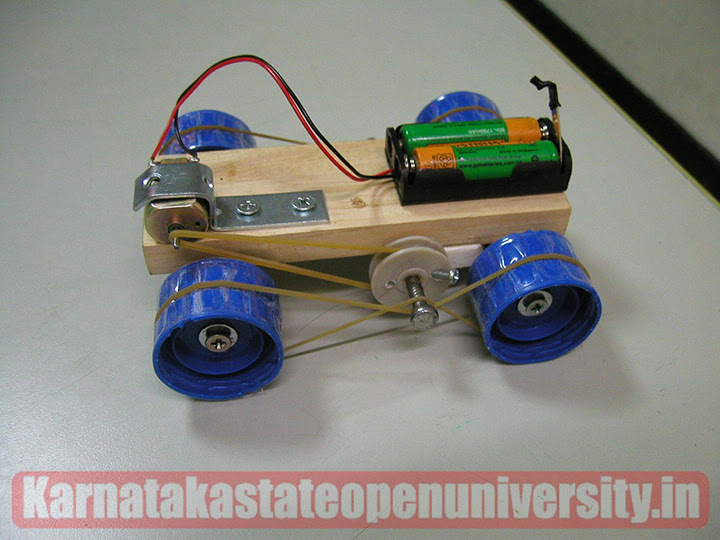
Making a simple one-direction electric toy car is easy, and can be done at home with just a few simple tools and materials. To start, you will need some wood, copper wire, and solder. You can find copper wire in any hardware store, and it is usually sold in round rolls or spools. Solder is an alloy of metals used for making electrical connections. It comes in solid form or as small wires that can be melted together to make joints. You will also need a drill, a bit large enough to fit into the diameter of the wood you are using, and a hand saw or metal file (preferably) to cut the wood.
How to Make a Simple One‐Direction Electric Toy Car Details


| Article for | How to Make a Simple One‐Direction Electric Toy Car 2024 |
| How to Make a Simple One‐Direction Electric Toy Car 2024 | Click Here |
| Category | How to guide |
| Official website | Click Here |
click here:- How to Build RC Cars?
How to Make a Simple One‐Direction Electric Toy Car Full Guides
In this tutorial, we will show you how to make a simple one-direction electric toy car. This project is great for kids and adults who enjoy building and engineering. We will provide you with all the necessary materials and instructions to complete the project successfully.
You can use different types of materials to build your car depending on your personal preferences and capabilities. You can use plastic, wood, or even cardboard as the base material. You can paint it any color you like or choose to leave it uncolored if you want. For the wheels, you can use small wooden blocks, wheels from toys like dolls, or even wheels from old bicycles. It is also a good idea to add some lights and sounds to the car so that it looks more fun and engaging. Overall, building a one-direction electric toy car is a fun and easy project that anyone can do!
Build the Wheels
1. Make a small enough hole in the plastic bottle cap for the rod to fit through.
2. Tape the edges of the bottle cap around. This is where electrical tape comes in handy because it gives you a rubbery grip on the wheel.
3. To obtain three additional wheels, repeat the process three more times.
4. To cover the rod, take a straw and cut the ends so they are shorter than 4 inches. Make sure that the exposed ends of the 4-inch rod are inserted into both wheels.
5. Apply glue to the rod and wheels. Keep it dry.
6. Place a small gear on one side of the other rod that is exposed. Allow the rod to dry before gluing the remaining two wheels on. The motor will be able to turn the rods and spin the wheels as a result of this.
Also Check- How to Remove a Dent in Car With Hair
Constructing the Body
1. Place two popsicle sticks side by side. Apply glue to the sticks and both rods.
2. Hold off while the glue dries.
3. Place the tiny gear into the DC motor’s shaft.
4. Turn the vehicle over so that the rods are facing upward. Make sure that the motor’s gear and the rod’s gear are perfectly aligned so that when one gear moves, the other will move as well. Wait for the motor to dry before gluing it.
Check Also- How to Push Start a Car 2024
Wiring the Car
1. Make yourself familiar with the tools. You will need to be familiar with soldering basics in order to follow these steps.
2. Take a clip buckle for a 9V battery. Red (+) and black (-) are the two wires that are attach. The DC motor that is providing the power is connected to these wires.
3. Try to tie a small knot with two ends of the same red or black wire. Then, to permanently join the two wires, place a hot soldering iron over the knot and melt the solder wire.
4. To extend the length of the wire, repeat this procedure as necessary. Keep in mind that black wires should be connect to black wires and red wires to red wires.
5. Connect the motor with both wires. Solder the end of the red wire to the motor’s top hole (positive eyebolt). Solder the black wire to the bottom hole (negative eyebolt) in a similar manner.
6. Probe it. Connect the wires to the 9V battery by snapping the clip buckle. The car will move forward as a result of the shaft turning counterclockwise if everything is done correctly.
- Note: The smaller terminal on the clip buckle is positive, while the larger terminal is negative. The car moves forward as the shaft spins counterclockwise when the larger negative terminal of the clip buckle is connect to the smaller positive terminal of the 9V battery, and vice versa.
- Similarly, when the larger negative terminal of the clip buckle is place close to the larger negative terminal of the 9V battery, the shaft spins in the opposite direction of the clock, causing the vehicle to move in the opposite direction.
Click Here- How to download Facebook videos
Controlling the Car
1. Make it move forward. The smaller positive terminal of the 9V battery should be connected to the larger negative terminal of the clip buckle, and vice versa. The vehicle will be able to proceed thanks to this.
2. Turn it around. Place the clip buckle’s larger negative and smaller positive terminals on top of each other for the 9V battery. The vehicle will be able to reverse due to this.
Related Post:-
Charge a Car Battery Step by Step Full Guide 2024