Wire a Car Stereo- A great way to give your old daily driver new life is to replace the stereo. You may be able to listen to new music and improve the overall sound quality of your car’s sound system by adding a CD player or MP3-ready stereo. It’s important to approach the installation with patience because doing it yourself can be a little intimidating. Before getting start, you might want to do some research on your particular vehicle due to the fact that every model stereo and car are slightly different.
How to Wire a Car Stereo
Connecting the stereo’s wiring harness to the adapter that will plug into your car is the first step in installing a new car stereo. The most important thing is to connect wires in a way that lasts and is safe. You can be sure that your connections will last for years to come and that your new car stereo will work properly if you use one or more of the methods shown below.
When you’re cruising in your car, who doesn’t like to listen to good music? It is one of the best ways to listen to music without being interrupt by phone calls, ringing phones, or other sounds. You can always make an investment in a better car sound system if you are dissatisfiey with the music output from your car stereo at the moment or if you have a basic setup that was install by the manufacturer. A straightforward Car Stereo Wiring Diagram will come in handy if you are one of the many auto enthusiasts who prefer to carry out all upgrades on their own.
How to Wire a Car Stereo Details


| Article for | How to Wire a Car Stereo 2024 |
| How to Wire a Car Stereo | Click Here |
| Category | How to guide |
| Official website | Click Here |
click here:- How to Build RC Cars?
How to Wire a Car Stereo 2024 Full Guides
Wire a stereo is the process of connecting wires to a stereo system. It involves several steps, such as removing the old stereo, stripping away any old cables, and installing new wires. Some newer car stereos have an integrated wire harness that makes it easier to install, but if you’re wiring an older model, it’s best to take extra care when doing so. Overall, wiring a car stereo is a quick and easy process that can dramatically improve the sound quality of your audio system.
Remove the Old Stereo
1. Unplug the battery. Before you begin, it is essential to disconnect the battery because you will be working on your car’s electrical system. Consult your owner’s manual if you are unsure where to locate the battery in your vehicle; While some batteries are kept in the trunk, the majority can be found under the hood. Use a hand or socket wrench to remove the black cable from the battery’s negative terminal once you have located it. You only need to loosen the bolt enough to pull the cable off the terminal, not completely remove it. To prevent the cable from coming back into contact with the terminal, tuck it away to the side of the battery.
- Neither the battery nor the cable need to be disconnected from the positive terminal.
- Check to see if the car’s cabin lights are on to ensure that the battery is disconnect. With the battery disconnected, nothing electronic should function.
- You will be shield from shocks and prevented from causing damage to the electrical system by disconnecting the battery.
2. Take out any necessary trim pieces. Your center console’s stock head unit (or stereo) must be access from the sides. That may necessitate removing some pieces of plastic trim from some automobiles. Trim pieces should be remove with caution because they may be brittle and susceptible to cracking. Try to slightly pull the trim out whenever you can to see what kind of clip is holding it in place. To separate the trim piece, you might need to slide it in a certain direction, use a screw driver to hit a release, or just pull hard enough. You can avoid breaking the clips and having to replace the trim by checking first.
- Consult your car’s repair manual if you want to determine the best way to remove pieces of trim that it are in your way.
- Set the trim aside where you won’t accidentally sit or step on that as you work.
Also check- How to Make a Car in Minecraft
3. Find out how to mount your head unit. One of two methods is use to secure car stereos: spring bolts or clips The removal process is different for each method. You can look carefully after removing the trim or consult your vehicle’s repair manual to determine the method your vehicle uses to secure the stereo. Spring clip mounts are identifiy by matching pairs of holes on either side of the stereo. And they may not necessitate the removal of any trim pieces. Because you will need to get into the area behind a stereo that is bolt in place. You may need to remove more trim from a stereo that is bolted in place.
- On the left and ride sides of the stereo, look for two pairs of matching holes. Spring clips hold your stereo in place if they are present.
- Remove the trim below, above, or to the side of the stereo if there are no holes to reach the bolts.
4. Spring-clipped stereos can be remove using DIN tools. You will need to purchase a pair of DIN tools if your head unit or stereo is held in place by spring clips. With their slightly hooked ends, DIN tools appear to be thin metal pieces bent into the letter “U.” One DIN tool should be insert into the two holes on the left, and another should be insert into the two holes on the right. Press both of them in until you hear the spring release clicking. To grasp the stereo’s back and pull the tools toward yourself, slightly space the tools apart. The tools and the stereo will slide out of the car’s console.
- If you’re stuck, you might be able to make your own DIN tools out of coat hanger pieces.
- If the stereo won’t come out, a piece of trim might be holding it in place. Instead of forcing it out, look for anything that might be holding it back from moving.
5. With wrenches, remove a stereo that is bolted in. Compared to spring-clipped stereos, you will probably need to take out a lot more trim to access the bolts that hold your stereo in place. The procedure for removing the stereo should be fairly straightforward once you can see the bolts: There will likely be four bolts that connect the stereo to a bracket on either side or the back of the unit. After determining their size, remove them with a hand wrench. Some brackets only require you to loosen the bolts enough to slide the stereo out. So you don’t have to take them out completely.
- Over the stereo, there may be a trim “faceplate” that pops off, revealing bolts in its face rather than behind it. Slide the stereo out by unscrewing these bolts.
- As you take the stereo out of the console, keep in mind that there are still wires that connect it to the car. Be careful not to cut any of them.
Click Here- How to Make a Paper Car 2024
6. Remove the wiring. If you are removing the stock head unit, you will most likely need to disconnect at least one plastic clip that has a number of wires in it. In some automobiles, there may also be a second clip and an antennae cable. All of the wires that need to be connect to the antennae, speakers, and power source of the vehicle are gather into these few clips. If you’re taking apart an aftermarket stereo, there’s a chance there won’t be a clip and the previous stereo was loosely wire. To connect the wires to the new head unit, you may need to cut them if that is the case.
- The clip’s wires should not be remove. If you can find a harness adaptor for your new stereo. It will plug right into the clip that is already in the car.
- When removing the wire harness clip from the stereo’s back, be careful. It might be held in place by a plastic tab or button.
Wire the New Stereo
1. Invest in a wiring adapter. A wiring harness clip adaptor can make the process of connecting each wire to your new stereo much simpler. And the diagram that comes with it will show you where each wire needs to be connect. The purpose of these adaptors is to make it simple to connect your new stereo to the clip in your car. Connect each wire to the new adaptor loosely using the diagram that comes with the stereo and the diagram that comes with the clip.
- You can order adaptors online or at the most auto parts or electronics stores.
- Using the adaptor greatly reduces the chances that it you will make a mistake wiring in your new stereo.
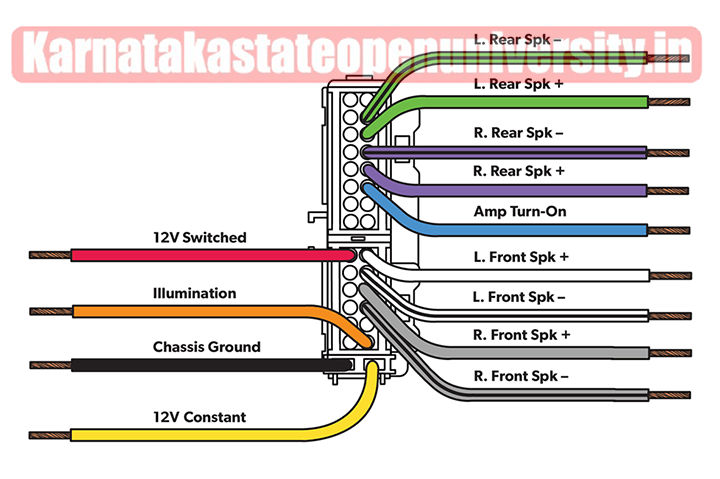
2. Locate and fix any loose wiring. You will need to identify the wires coming out of the car and the stereo if you are not using a wiring harness clip adaptor. If you don’t have an adaptor. You’ll have to cut the wires on the back of the harness clip of the car. Cut them one at a time as you connect them to the wires on the stereo that correspond to them to avoid confusion. To help you identify each wire, consult your vehicle’s repair manual or browse an online wiring diagram. The following connections will be require by most car stereos:
Check here- How to Idle a Car 2024
- The stereo’s power wire, which is typically red, will likely connect to a car’s red wire.
- Both the stereo’s ground wire and the car’s corresponding wire will be black. You can use the ground cable to connect to bare metal in the car’s body if there is no ground wire.
- The 12 volt constant power wire is typically yellow or blue. But it may come from the vehicle in a variety of colors.
- The speakers use the remaining harness wires. Use the diagrams to make sure that each wire from the car is the right one.
- The antenna wire is much thicker and has a metal head. Before installing the stereo, you can connect it separately. Most of the time, these short wires won’t be connected again until you’re about to put in the new stereo.
3. Interface the result convertor if fundamental. A few vehicles will require a result converter to make it work appropriately with parts of the vehicle that are not normal industry wide. A few automakers utilize outside enhancers the sound system’s sign should make up for. Your sound system might have accompanied a result convertor, yet all things considered. You should arrange it from a car parts or gadgets store. Be certain you request a result converter planned explicitly for your year, make and model vehicle.
- If you are unsure if that your vehicle utilizes external amplifiers, refer to the owner’s manual.
4. Secure every wire that is connected. You will need to make those connections permanent once all of the wiring has been connected to their respective wires. There are a variety of methods for permanently joining two wires. And while some may be more durable than others, the majority are adequate for car stereo applications. Wrapping the wire connections in heat-shrink wrap or electric tape will ensure that no bare metal is visible.
- A soldering iron and solder are required to join two wires. To join the wires, you melt solder onto them and let it cool, forming a bond that lasts forever.
- For car stereos, wires can be covered with heat-shrink wrap or electric tape after being twisted together.
- You can buy connectors that you simply slide both wires into and either crimp with pliers or twist with your fingers to join them.
Check Aslo- How to Fix the Alignment on a Car
Install the New Stereo
1. Examine the stereo. Check that the stereo is working properly by reconnecting the battery and starting the vehicle before installing it in the center console. Turn on the stereo after everything is connected and test a few functions. Check that your MP3 player or CDs play correctly and that all of your car’s speakers are working. Make sure the radio is working if you have already connected the antennae cable.
- If you check the functions of the stereo now, you won’t have to take the console apart again to fix any wiring issues.
- Check the connections with the wiring diagrams you have in case something doesn’t work right to make sure that all of the wires are connected to their corresponding matches.
- After testing the stereo, remove the keys and reconnect the battery.
2. Insert each and every wire into the dashboard. You might have noticed that the majority of the wires you connected to your stereo were flexible. As you place the connected car stereo in its opening, use the other hand to tuck all of the additional wire back into the dashboard. Connect the large antennae cable now as you put the stereo in its place if you haven’t been able to connect it yet because it was too short.
- As you tuck the wires back into the dash board, be careful not to pull any wires out of the stereo’s back.
- If your stereo needs to be bolted into place, try not to let the wiring get in the way of the bracket you’ll need to attach it to.
3. Install the stereo once more. Be careful not to put too much pressure on the radio’s face as you slowly slide it back into the vehicle’s center console opening. Do not continue inserting the stereo if you encounter resistance. Instead, take the stereo out, locate the obstruction, move it, and try to slide it back in. There is a possibility that plastic brackets or wires will come loose as you slide the stereo into place. By forcing the stereo through a snag. You risk breaking things and causing the stereo to malfunction or not fit in the vehicle properly.
- In order to insert the brand-new stereo into the existing hole, some automobiles may necessitate the use of an adaptor. Auto parts and electronics stores sell these adaptors.
Also Check- How to Remove Chewing Gum from a Car
4. Guard the brand-new stereo. If your stereo has spring clips, you won’t need to do anything else to secure it because it will click as it locks in place. Use the bolts you removed earlier to secure the new stereo in the same location if yours uses brackets and bolts. Assuming you need to utilize a connector to appropriately fit the sound system in its space in the control center, guarantee the sound system is gotten to the connector and that the connector is gotten to the vehicle.
- Before reinstalling the trim, ensure that the bolts are securely fasten.
- After that, try to shake the stereo. When properly secured, it should not move at all.
5. Install the trim again. Reinstall each piece in the opposite order that you removed them. It taking care not to break any of the plastic clips that hold the trim in place. This means that you should put in the final piece you took out first, then the second one, and so on. This will guarantee that overlapping pieces are properly layer.
- You can use a hot glue gun to attach trim pieces to your car if a clip breaks and the trim won’t stay in place. However, keep in mind that doing so will make it harder to remove the trim in the future.
- Because the majority of auto parts stores do not carry trim components. If you break an entire trim piece, you will most likely need to special order a replacement from the dealership.
Related Post:-
How to Remove Grease and Oil From a Car Interior 2024
Apple Maps Weather app labels Crimea under Ukraine?
How To Remove An Account From Google Photos on Android and iPhone 2024?