Make an Awesome Toy Car with Recycled Materials- A fun and simple project that can be completed at home with recycled materials that you already have is making a toy car. It’s also a great way to spend time with your kids or with yourself to reconnect with your inner child. In this article, we’ll show you how to make a DIY toy car in just a few minutes using four simple methods. To get started, scroll down. First, find some old toys or other household items that you can use to make your car.
You’ll want to select items that are durable (so they don’t break easily) and easy to work with (so they don’t disintegrate in your hands). For example, you could use wood blocks or wooden pieces from a toy chest, plastic wheels from a toy truck, or even discarded Lego pieces. Once you’ve selected your materials, begin by cutting them into small pieces. You can use scissors or a craft knife if you’re particularly skilled with small blades. Don’t worry if some of the materials break as you cut them—you can use these scraps to create the body of your car.
Make an Awesome Toy Car with Recycled Materials
Place a magnet on the tabletop’s bottom so that the car’s pole and the tabletop’s magnet’s pole are opposite one another. The car will move in any direction away from the magnet if the magnetic poles are not positioned opposite one another. Our most recent infographic shows how many new products can be made from recycled scrap cars, including pharmaceuticals and wedding rings made from recycled catalytic converters. Once all your ingredients are ready and mixed up, it’s time to build the body of your car! Start by applying the mixture to one side of a piece of cardboard or paper towel (we used newspaper in our example).
Apply small amounts at a time so that you can press down firmly on the mixture with your hand to spread it evenly across the surface. Repeat this step until you’ve covered the entire surface area of the cardboard/paper towel with the mixture. Next, mix the materials together until you have a smooth mixture that flows easily when placed in a container. The mixture should be thick enough to hold its shape when pressed but not so thick that it clumps together when dripped or squeezed. For example, oil and water might work well for this project because they mix easily without forming lumps.
Make an Awesome Toy Car with Recycled Materials Details


| Article for | 4 DIY Methods to Make an Awesome Toy Car with Recycled Materials 2024 |
| 4 DIY Methods to Make an Awesome Toy Car with Recycled Materials 2024 | Click Here |
| Category | How to guide |
| Official website | Click Here |
click here:-How to Build a LEGO Car 2024?
Things you should you Know
- To accommodate axles, empty a plastic water bottle and drill four holes in it. The wheels are made of plastic bottle caps and the axles are made of two plastic straws.
- Tape 2 plastic straws to an empty milk carton and attach 4 plastic bottle caps to the 4 ends for the wheels on this.
- Use a rubber band to attach a balloon to the flexible end of a straw to make a balloon-powered toy car. Put the straw on the car with tape and blow into it.
- Wrap a rubber band around the car’s front axle to create a rubber band-powered vehicle. After that, attach a paper clip to the rubber band.
Also Check- How to Check a Car Battery 2024
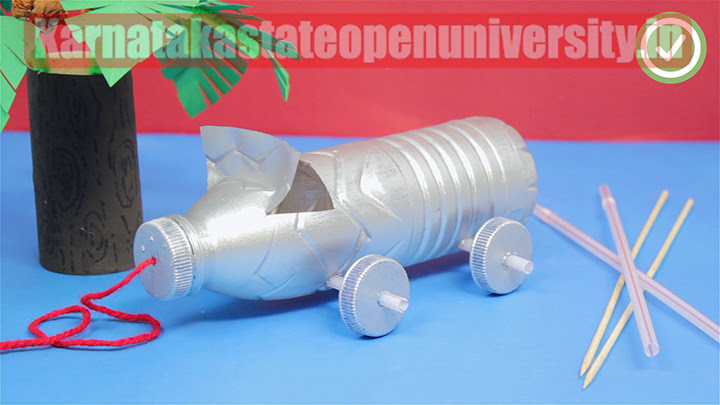
Bottle Toy Car
1. Remove the label from an empty plastic water bottle and clean it. To loosen the label, soak the bottle for ten minutes in warm water and dish soap. Give the bottle a thorough scrub to get rid of any glue residue after removing the label with your fingers.
- Any plastic bottle you have on hand can be used. A bottle of water or soda is ideal, but you could also use an empty hand sanitizer bottle or anything else that is easily accessible.
2. Make two sets of holes in the bottle, one on each side. Make one pair of holes on each side of the bottle with a power drill that are 2 to 3 inches (5.1 to 7.6 cm) down from the neck. The remaining pair of holes should be drilled 2 to 3 in (5.1 to 7.6 cm) above the bottle’s bottom. Make sure that the holes in each set are parallel to one another.
- If you’re a kid, let an adult handle the drill so you it don’t hurt yourself.
- If you don’t have a drill, use scissors or an ice pick on this.
3. If you want, spray paint the plastic bottle and its four caps. The plastic bottle will be used on the car’s exterior; keep the bottle’s original cap because you’ll be using it soon. The wheels can be made by grabbing an additional four bottle caps. Pick any color for the paint! Cool would be a silver car with silver wheels.
- It’s easier to paint the bottle and bottle caps before assembling the toy car.
4. Two plastic straws should be cut to approximately 13 cm (five inches) in length. Adjust the length of both straws to match the plastic bottle you are using so that they are slightly longer than the width of the bottle.
- If you don’t have plastic straws, you that it can improvise with sticks, pencils, or thick wire from a wire hanger.
5. Put the straws made of plastic through the bottle’s openings. Run one straw through the top set of holes for the front wheels and the other straw through the bottom set of holes for the rear wheels because the axles hold the front and rear wheels together. Place the straws in the middle of the bottle so that they have equal lengths sticking out of both sides.
6. Make a hole in the middle of the original bottle cap with a drill. Make a hole by unscrewing the original bottle cap. After that, tie a knot in a piece of yarn or string and thread it through the lid’s hole, making sure the knot is on the inside. Re-screw the plastic bottle’s lid.
- The string is optional, but it you want to use it, cut that piece to be 12–24 in (30–61 cm) long (you’ll use the string to pull the toycar).
- Put the lid back on the bottle so the length of string hangs outside the lid in front of the cars.
7. If you want, you can make a windshield by cutting off the bottle’s top. Get an adult to use scissors or a box cutter to cut a rectangle or square into the front top of the bottle if you want to make a windshield. After cutting only three sides, flip the shape upside down so that the windshield faces the bottle’s lid.
8. Through each of the four plastic bottle caps, make a hole. Make a hole in the middle of each bottle cap with a drill or another sharp object, like an ice pick, by letting an adult do it. A plastic straw needs to be able to fit through each hole.
9. Attach the bottle caps to the axles of the plastic straws. Pass the axles through the bottle cap holes you drilled. To improve the vehicle’s stability, turn the bottle cap’s open side toward the vehicle.
10. Use the string to pull the car or push it on a flat surface. Your toy should be able to move forward on its wheels because the axles should turn like a real car! Pushing the car will cause it to move even if you don’t want to use the string.
Check Also- How to Junk a Car 2024
Milk Carton Toy Car
1. A milk carton should be covered with two wooden skewers. For your car, use a milk carton with a single serving. With the long side facing down, place the empty milk carton on a flat surface. Make the skewers slightly longer than the milk carton’s width. The car’s axles will be the skewers.
- If you don’t have a single-serving milk cartons, cut out a 4 in × 6 in (10 cm × 15 cm) piece of cardboard.
2. Drill holes into the centers of four plastic bottle caps. If you don’t have a power drill, let an adult use a box cutter, knife, or scissors to make holes. Your automobile’s wheels will be the caps on plastic bottles.
3. Each skewer should have a bottle cap inserted at one end. Each bottle cap’s top should be pointing toward the milk carton for better stability. To make it stronger, you can use hot glue where the skewer and cap meet; just wait for the glue to dry before proceeding.
4. Stick the skewer through a plastic straw that is shorter than the skewer. Reduce the length of the straws so that they are a little shorter than the skewer. Pass a straw through each skewer’s free end.
- Threading the skewers inside of the straws will make the wheels spin.
5. Through the remaining two bottle caps, insert the skewers. Place the milk carton’s top on top of the bottle caps. Apply hot glue where the skewer and cap meet to strengthen the wheels. After that, give the glue a few minutes to dry.
6. Tape the axles to the milk carton in a horizontal pattern. Place one axle a few inches below the carton’s top and the other a few inches above the carton’s bottom.
7. Give the car a spin after customizing it as you see fit. The milk carton can be decorated however you like (or not) with markers, paint, or construction paper. You can also give the milk carton character by cutting shapes into it.
Check Here- How to Remove Pet Hair from Your Car
Balloon-Powered Cardboard Car
1. Make a cardboard rectangle that is 4 in x 6 in (10 cm x 15 cm). With a pencil, trace the lines on the cardboard using a ruler or measuring tape. Then, cut along the lines you’ve drawn with a box cutter or sturdy scissors.
- Paper boxes can be used in place of cardboard. Alternately, to make them as thick as cardboard, glue several layers of recycled shipping or toilet paper together.
2. Four plastic bottle caps should have holes punched through the middle. Make a hole in the middle of each bottle cap with a power drill or other sharp tool only if you are an adult. The wheels for your toy car will be made from these bottle caps.
3. Tape the halves of a plastic straw horizontally across the cardboard. The cardboard should be positioned with its long ends on top and bottom and its short ends on the left and right. Tape one straw on each end of each half of each straw horizontally across the surface of the cardboard (the pieces should be parallel to the short ends of the cardboard).
- Position the first straw about 2 in (5.1 cm) from the top of the cardboard and the other straw about it 2 in (5.1 cm) from the bottom of the cardboard.
4. Put one half of a wooden skewer through each straw by cutting it in half. Thread the skewers through the center of each straw by trimming them to be slightly longer than the straws. Your car’s axles will be the two bamboo skewers.
5. Use hot glue to secure the bottle caps to the ends of the skewers. Make certain that the cardboard is facing the top of each bottle cap. The caps should be pushed down the skewers so that they rest against the cardboard. To secure the caps, use hot glue.
6. Cut a flexible plastic straw in half cut. Make sure it pieces are of equal length. Then, it discard the part of the straw that doesn’t bend.
7. Using a rubber band, attach the balloon to the flexible drinking straw. Over one side of the straw, place the balloon’s elastic part. Wrap a rubber band around the balloon’s elastic part with the straw inside.
- It that can help to inflate and deflate the balloon a few times to stretch the rubber first.
- Blow into the straw to test if the rubber band is tight enough. No air should be able to escape the balloons.
8. Attach the straw and balloon with tape to the cardboard’s short end. The axles should be on the bottom side of the cardboard piece. Tape the straw’s end to the cardboard’s short end. The straw ought to have one half extended past the cardboard’s edge.
9. To make the car roll, blow into the straw. Blowing into the balloon through the straw after picking up the car Place the car on a flat surface before releasing the straw so that no air escapes. The balloon’s air will escape and propel the vehicle forward!
- You may have to straighten the wheels a few times to get the best movement this.
Click Here- How to Make a Balloon Car
Rubber Band-Powered Car
1. For this car, cut a piece of corrugated cardboard that is 5 inches by 9 inches (13 cm by 23 cm). The piece of cardboard must be slightly longer than a standard plastic drinking straw, which is 22 centimeters (8.5 inches) long. The cardboard’s width doesn’t have to be exactly the same; it can be about half that.)
2. Attach two straws, one at each end, with tape to the top of the cardboard. Line up the straws so that they are parallel to one another and place them horizontally across the cardboard. The wheels’ axles will be held in place by the straws.
3. Attach two straws, one at each end, with tape to the top of the cardboard. Line up the straws so that they are parallel to one another and place them horizontally across the cardboard. The wheels’ axles will be held in place by the straws.
4. Through each straw, insert a wooden skewer. Place each skewer in the center of the straw so that an equal amount extends out from each side. Your car’s axles, which will hold the wheels in place, will be the wooden skewers.
5. Four sponge pieces measuring 2.5 cm x 2.5 cm should be cut out. Apply one sponge piece to each wooden skewer’s end. The sponge will be punctured by the skewer with light pressure, but it will remain in place.
6. On the ends of the wooden skewers, place an old CD. Your wheels are on the CDs! To ensure that the sponge holds the CD in place, insert the sponge pieces into the CDs’ center holes. Tape will prevent the CD from wobbling.
7. The exposed portion of the front wooden skewer should be secured with a rubber band. Because you cut that notch in the cardboard or straw earlier, the center of the skewer will be visible. Tape the rubber band to the skewer to secure it, leaving about 12 inches (1.3 centimeters) of the end untwisted.
- Try rotating the front skewer—as the skewer rotates, the rubber band should rotate with it.
8. A 12-inch (1.3-cm) slot in the middle of the cardboard should be cut. Using a box cutter, a power drill, or scissors, cut a horizontal hole in the middle of the vehicle. The cut should be parallel to the cardboard rectangle’s short ends.
9. Attach the rubber band by inserting a paper clip into the center slot. The paperclip can be unbent, but one of its hooked ends must remain. Stick the straight end into the slot, and then attach the free end of the rubber band to the hook on the paper clip.
10. Release the rubber band-attached axle by winding it up. Put the car down on a flat surface after winding up the axle, and then release the axle to make the car roll forward!
- If the rubber band didn’t unwind after you let go, wind it more tightly and give it another try.
- If the rubber band unwound but the axle didn’t spin, secure the rubber band to the skewer with more top or hot glue.
Related Post:-
Remove Vomit Smell from Your Car 2024